Pineapple (Ananas), like many other tropical plants, can be grown at home and it is very easy to do it - just buy a good ripe fruit and grow a tropical miracle from it.
The culture belongs to the Bromeliaceae family, however, unlike Echmeya or Gzmania, it is not an epiphyte, although it has similar care requirements.
The potted plant usually grows small in size, just over 50-90 cm in height. As it grows, it creates a rosette of narrow, long leaves arranged in a spiral.
If you create all the necessary conditions for the pineapple when growing, then for 2-3 years it will delight you with the appearance of a peduncle 30-50 cm high, on which an inflorescence of numerous flowers is formed.
Common indoor types
At home, three types of pineapple are successfully grown.
Large-crested pineapple (A. Comosus) , which is characterized by good fruiting. The leaves are green, very long, narrow, with thorns along the edge.
There is also the A.comosus Variegatus variant. It has shorter, variegated leaves and a rose-red fruit. This pineapple hybrid is grown at home mainly for decorative purposes.
In recent years, Dutch growers have developed a dwarf variety especially for indoor cultivation - Ananas nanus or Dwarf - a delightful little pineapple that is only 30-40 cm tall. The small pink inflorescence subsequently produces small edible fruits.

The leaves are long, hard, dark green or gray-gray, which turn maroon in the sun. The height of the "Champaca" variety of the dwarf group is approximately 35 cm (including the pot).
Pineapple bracts (A. Bracteatus) , namely its variation A. Bracteatus tricolor. It is characterized by high growth, long, belt-like green leaves with bright longitudinal stripes of red, pink, white or cream shades.
The edges of the plate are serrated or smooth. Spectacular bright red fruits are edible, but not very tasty, so this species attracts flower growers with its decorative qualities.

All potted varieties are widely available in flower shops.
#Step 1 How to plant pineapple at home step by step
The easiest way to grow indoor exotic by yourself is to use a fruit bought in a store. The fruits of the culture are sold together with a leaf rosette - a tuft, which is located in the upper part and has the ability to quickly root
Attention! When buying a fruit, pay attention to its freshness and ripeness, which is indicated by its golden yellow color. The rosette must be free from signs of damage, rot, or mold.
#Step 2
Grasp the outlet with your hand and unscrew it. This method is more correct, but only works with mature fruits, then the rosette with a stem is easily separated from the top of the fruit, leaving no pulp.
If for some reason you did not succeed, then using a sharp knife, cut off the tuft with a piece of pulp about 1 cm thick.
Then, carefully trim away the flesh until only the harder, fibrous portion of the bare stem remains, on which you can see the root buds as brownish dots.

# Step 3
From the beginning of the rosette, remove the leaves so that about 2-3 cm of a bare fragment of the stem remains.
In order not to damage the aerial roots growing from the leaf sinuses, the leaves must be pulled perpendicular to the stem of the outlet, and then plucked or cut with a knife.

# Step 4
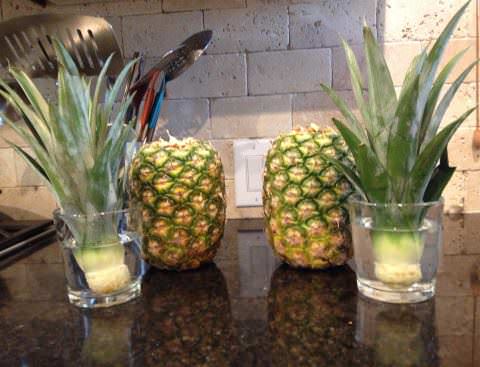
At this stage, we are sprouting the top of the pineapple. Immerse the cut, leafless portion in a jar or cup of clean, soft water at room temperature.
It is necessary to change the water every second day to avoid the development of mold.
Root formation can be seen after 1 week. If the plant is not going to take root, then the rosette dries up quickly. Then it makes sense to purchase a new fruit and repeat the procedure.
# Step 5
Let's describe how to root pineapple at home. After about a month, the roots will reach a length of several centimeters. The seedling is taken out of the water, put on a towel and left to dry for 2-3 hours, since the culture is very susceptible to decay.


The plant does not develop long roots, so we take a small and shallow pot, about 2 cm of free space should remain around the outlet. At the bottom we lay out a drainage layer of expanded clay.
We use the soil for bromeliads with the addition of 2 parts of perlite. When planting, we deepen the entire stem fragment without leaves.
# Step 6

Keep the pot out of direct sunlight for the next few weeks. Make sure the soil is constantly moderately moist, but not wet. The rooting temperature is 21-27 ° C. Water carefully over the diameter of the pot. It is also helpful to spray soft water onto the leaves.
After a month, you can check rooting - try to slightly tilt the tuft to the side, if you feel a little resistance, then the roots are developing.
After about two months, signs of leaf growth can be seen emerging from the center of the rosette. This is a sign of successful rooting.

# Step 7
With the beginning of the growth of the ground part, the pot is placed in a sunny place, and watering is carried out once a week. The plant enters the fruiting season after 2-3 years. During this time, 2 transplants into a larger pot will be required.
#Step 8 Caring for indoor pineapple after rooting
Growing pineapple at home doesn't take a lot of effort. The main factors of care are light, watering and a warm location.
# Step 9 Lighting
The culture needs to be provided with plenty of bright sunlight, at least 10 hours a day. The best exposure is considered to be windows facing south, southeast or southwest. If there is a lack of lighting, be sure to use supplementary lighting with a phytolamp. This is especially true for the autumn-winter months.
# Step 10 How to water pineapple
Unlike other bromeliads, the leaf rosette of the plant is not intended to store water, although the leaves have special hairs that absorb moisture from the air, so it is necessary to spray the foliage 2-3 times a week, and also water not only the soil, but also the center of the rosette ... In winter, spraying is carried out once a week.
Watering should be appropriate for the season and conditions. In spring and summer, an earthen lump is abundantly irrigated, but the soil should dry out a little between waterings. Do not flood the plant, as excess moisture leads to the development of fungal diseases and mold.
From mid-autumn and winter, watering is limited. The soil should be only slightly damp so that the delicate pineapple roots do not dry out.
It is very important to use thawed, rainfall or, in extreme cases, settled water for irrigation. Never water with cold water, its temperature should be about 28-30 ̊С. Once a month, the water for irrigation is slightly acidified with citric acid to a pH of 5-6, which has a beneficial effect on the growth of your green pet.
Air humidity should be 40-60%. If it drops below, then spray more often and place the pot on a tray with wet expanded clay or pebbles. The plant reacts to insufficient moisture by drying the tips of the foliage.
# Step 11 Temperature
The plant belongs to thermophilic crops. The optimum temperature throughout the year is 25-30 ° C. In winter, it can drop to 22 °. C. Pineapple growth slows down in cool conditions.
Make sure that the temperature does not drop below 18 ° C and protect the plant from cold drafts, as this is detrimental to tropical exotic species.
Also, do not place the pot on a cold surface - the pineapple roots should always be warm. Better to use a wooden stand or place the pot on a radiator.
Fresh warm air has a beneficial effect on crop growth. In warm weather, it is useful to take the pot out to the balcony or terrace, but only if the night temperatures are appropriate for the growing conditions. Indoor pineapple does not go through a dormant period. If you provide it with a warm position and sufficient humidity throughout the year, it will constantly grow.
# Step 12 dressing and transplanting
Fertilizer is applied during the active growing season every 2 weeks, using feeding for bromeliads or succulents and only half the dose recommended by the manufacturer.
Since the plant can absorb nutrients through the leaves, it is best to alternate foliar feeding with the usual, spraying the ground part with water with the addition of fertilizers.
The first time the transplant is carried out one year after rooting. Then they are transplanted every 1-2 years in the spring or early summer, using soil for bromeliads. The soil mixture can be prepared by yourself. To do this, mix the universal soil with sand or perlite and peat in a ratio of 2: 1: 1.
It is better to choose a pot one size larger than the previous one, wide, shallow, terracotta or ceramic, so that during the period of fruit formation it can support the weight of the plant. The procedure is carried out necessarily by the transshipment method so as not to damage the sensitive root system of the plant.
Before planting the pineapple, a layer of expanded clay 2-3 cm high is laid out at the bottom of the pot. The plant is deepened a little deeper than the previous level so that a stronger root system develops. After the procedure, the plant is well watered with a weak solution of potassium permanganate to avoid the development of fungal diseases.
#Step 13 Reproduction of pineapple at home
After fruiting, the plant slowly dies and often this wilting process takes 3 years. During this time, you can easily grow a new indoor pineapple. The culture propagates with the help of the top of the fruit, as described above, or with lateral offshoots that develop at the base of the rosette during the ripening of the fruit.

The procedure is more convenient to carry out in the summer during the hot period. The lateral processes are separated by hand when they reach 15-20 c Then they are left in a dark place for 3-4 days so that the separation site dries up and heals.
If it is not possible to plant the offshoot after these days, then you can start planting later, since the separated offspring root well even after a month or more, which is due to the structure of the bromeliad rosette, which accumulates water reserves and can withstand a period of drought.
Young plants are planted in a mixture of leafy soil, peat and perlite in a ratio of 3: 2: 1 to a depth of 2-3 cm, watered with a warm weak solution of potassium permanganate and covered with a transparent bag or jar. Successful rooting takes place at a temperature of at least 25 ° C in a place with bright diffused light or in partial shade.
# Step 14 Blooming pineapple at home
Typically, the plant begins to bloom about 1.5-2 years after rooting. However, if flowers do not even think to appear by this time, then indoor pineapple can be helped a little.
To do this, we take one ripe apple and cut it in half. We place one half on the potting soil with a cut to the ground, the other half on a leaf rosette. Then covers the entire ground part with a plastic bag, and leave it for 2-4 weeks.
The ethylene produced by the apple penetrates into the roots, thereby stimulating flowering, which begins after 2-4 weeks. As soon as you see the development of the peduncle and flower buds, the cover can be removed and the remnants of the apple removed. It will take 4-6 months for the inflorescence to fully form. Flowering lasts about 2 weeks and fruit ripening lasts for 4-7 months.
# Step 15 Growing problems
- Drafts cause puckering and curling of the lower leaves.
- The gradual death of leaves always occurs after fruiting.
- Slow growth signals a low temperature or lack of nutrients.
- Brown tips of foliage indicate dry air and lack of moisture.
- If you notice the appearance of spots on the crest, this is a sign of excess moisture.
- If yellow spots appear on the leaves, especially along the nerves, this means that the plant has been attacked by scabies. Remove them by hand with soap-soaked cotton pads. Dry air can cause the appearance of spider mites, which are eliminated with the help of chemicals.


.jpeg)


0 Comments
Post a Comment